Spring Rate: For optimal rear shock ride quality, shoot for 25% sag. Sag is measured by the maximum stroke of the shock and subtracting 25%. If your shock is 57mm stroke you want to see 42.75mm of the shock shaft exposed when seated on the bike in a resting position geared up ready to ride. If it’s 50mm, you want to see 37.5mm of the shock shaft exposed when seated on the bike ready to ride. Air shocks make it easy with o-ring travel guides. Coil shocks, you can use the bump-stop cushion pushed up to the underside of the body.
You may require 10-15% more air or next heavier spring compared to what the shock manufacturer recommends for your weight. Using a spring calculator with your measurements and set to achieve 25% sag should get you set up to shred.
Airshocks typically require max volume reducers in the positive chamber and 1 in the negative chamber.
Rebound damping: Start with slowest rebound and adjust to your riding preference.
DVO Tech Site:
https://tech.dvosuspension.com/setup/owners-manuals/
MRP Tech Site:
https://mrpbike.com/pages/tech-resources
We highly recommend washing only with a soft bristle brush or microfiber with very light use of water and also air drying immediately after. This will keep your bike looking amazing for many years if done properly.
*Do Not Allow Water to Enter the the Internal Dropper Seat Post Routing Hole*
All Ferrum frames are protected with a military grade internal rust protection film. The film is permanent but it’s not rated for prolonged water retention from negligence.
The initial treatment film is designed to withstand most typical riding conditions and condensation. It also protects when riding in wet areas and humid climates, not diving lessons though.
Please respect Earth’s finite resources such as fresh water and don’t just blast your frame with a water hose! If you insist on cleaning your frame with a water hose, please don’t allow water to enter the dropper seat post internal cable hole area and immediately use compressed air or a leaf blower to dry your frame completely. For peace of mind, you can temporarily plug the dropper cable hole with something while you wash your bike. If you want an added layer of protection, there are also rubber internal cable routing frame plugs available for low cost here (choose thin):
https://www.jensonusa.com/Salsa-Frame-Plugs-for-internal-routing
*NEVER USE A PRESSURE WASHER*
Every bike requires maintenance. Your Ferrum mountain bike frame is no different. Your Ferrum mountain bike frame arrives treated to prevent rust during final assembly but your frame requires periodic maintenance of this protection to retain your warranty. If you live in a dry climate and you’re not giving your frame swimming lessons, you will require less of this type of upkeep. If you live in a place where it’s extremely humid or they salt the roads in the winter, you’re already familiar with this type of practice with automobiles etc.
For peace of mind, we suggest before/after every season that you apply a rust preventative coating to the frame through the purge/vent/breather holes in the frame tubes. We have seen the following options as well as others: “RP342”, “Pro Gold Steel Frame Protector”, “Fluid Film”, “Protection First Class”, “WD-40 Long Term Corrosion Protector”, “XCP Rust Blocker” and even chain lube, as recommended by other popular steel frame manufacturers/builders. We’ve tested most of these products and they appeared adequate. Our favorite is “CRC Marine Heavy Duty Corrosion Inhibitor” as it held up to serious abuse. Most of these films are non-hazardous, non-toxic and typically won’t affect the frame finish at all.
REMINDER: Do not allow water to enter the dropper post internal cable routing hole. If very little enters, this is fine but anything more than ~3ml will require seat post and BB removal for drying and evaporation. RTV or a cable routing frame plug will add additional peace of mind. Purchase a “thin” internal cable frame plug here:
https://www.jensonusa.com/Salsa-Frame-Plugs-for-internal-routing
Avoid alcohol based cleaners!
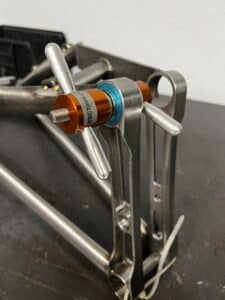
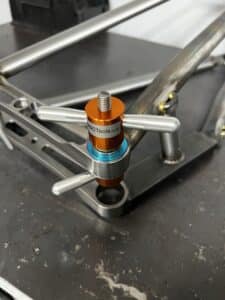
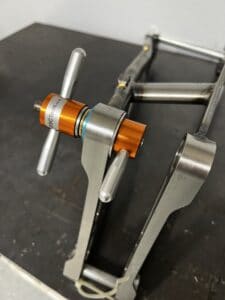
Ferrum Full Suspension Chromoly Steel Mountain Bike Frames from 2018-2024 (LV/MV/NV/LVN) use 4 pivot bearings. The bearings are #6001-2rs and can be purchased from most any local hardware store or online but Enduro Max brand is our favorite when available. They are very slight interference fit and retained via side clamping force from the pivot axle. The bearings and pivot axles must also be locked in their cups with Loctite 635/638 or Vibra-Tite 541 retaining compound.
REMOVAL: To break the bond of the retaining compound, loosening a bolt on the axle and heating it up with a heat gun (disclaimer* This is dangerous, only trained professionals should handle dangerous tasks such as using heat or torches as people and property can be injured or damaged, we are not responsible for your actions) is a popular option. To remove the bearings you must break the bond of the assembly retaining compound by heating it up enough to liquefy it. To heat the assembly up, we suggest the use of a hair dryer (a heat gun may be used but it will possibly damage your frame finish if you’re not extremely careful) to heat up the assembly well and re-liquefy the assembly compound, then you may use a bearing removal tool to drive the bearings out.
When installing new bearings, re-apply the recommended retaining compound to the bearing outer race surfaces and the pivot axle, assemble in reverse of disassembly and let it set 24-48 hours before riding to allow the compound to cure.
*2022 and newer models typically don’t use retaining compound on the pivot bearing housing/bearing outer races, only grease. The pivot axle does still require Loctite 635/638 or Vibra-Tite 541 retaining compound.
We like the bearing press and extractor tools from bicycleservicecentre.co.uk
You can purchase the tool here:
https://www.bicycleservicecentre.co.uk/product/m8-pivot/115
- Rear Axle: Per axle manufacturer specs usually etched on the axle.
- Derailleur Hangers: Full Suspension 16 ft-lbs. with medium strength thread locker. Hardtail 17-nm with medium strength thread locker.
- Pivot Axle: 19 ft-lbs. with medium strength thread locker
Your shock’s rear eyelet IGUS bushing is a wear item and will require periodic replacement depending on riding conditions and use/abuse. If any play is felt in this area, this wears before the 4 main pivot bearings and it’s time for shock bushing replacement.
LV145, NV170 size is 22×8 and 40mmx8mm.
LVN140, LVN160 and LVN190 is 22×8 and 15×8. DU Bushings and stainless steel hardware are ideal but hard to come by.
DVO and MRP sell the hardware directly, we don’t provide or sell replacement rear eyelet hardware at this time.
1) Always check for bends, cracks or anything suspicious.
2) Always ensure that your slider dropout hangers are tight.
3) Always ensure that your pivot arms brace is tight.
4) Check all other bolts on your bike before your ride to maintain maximum safety and longevity of your frame.
5) Always ensure that your rear axle is tight.